2 Piece Mold of 6” Swim Whiz

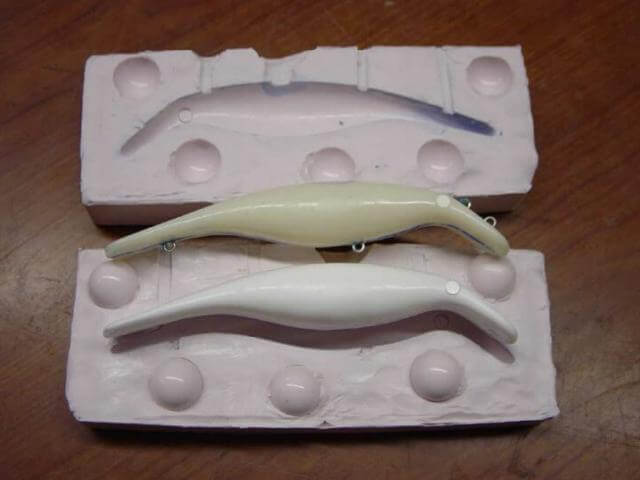
This tutorial will walk you through the process of making a two piece mold for a fishing lure.
Use a popsicle stick or any other similar shaped item to create your pour and vent holes. This will create the area in which you will pour the resin into the mold and the vents which will allow the air to escape the mold to prevent air bubbles from being trapped in your finished casting.
Note: You can choose to cut your pour and vent holes after you pour both halves of your mold if you prefer. You can also cut in locators into the mold after you pour the first half of the mold prior to pouring the second half. This is completely a preference of the mold maker. For demonstration we are adding them in prior to pouring the first half of the mold.
Measure the proper amounts of base and catalyst of High Strength 2 silicone mold making rubber. If you need help figuring out how much silicone is required for your piece, use the Calculating Volumes page on this site (found on the tool bar above). If you have the ability to degas the silicone it is recommended but by no means required.
If you do not have vacuum, simply brush on the first coat of silicone rubber over the lure and then continue to pour the mold box full starting in one corner and allowing the rubber to flow naturally to fill the box. Brushing the silicone on will squeegee the air off of the surface and paint on a skin coat of silicone that will not allow air to hold onto the surface of the lure. Bubbles that can no longer hold on to the lure will float to the top away from the mold surface giving you a great mold of the lure.
Carefully remove the clay but be sure NOT to remove the lure from the first half of the silicone rubber mold. It is very important to not even break the seal between the lure and the first pour of silicone rubber. This seal prevents the second pour of silicone from leaking between the lure and the first half of the mold which will mess up your parting line.Carefully remove the clay but be sure NOT to remove the lure from the first half of the silicone rubber mold. It is very important to not even break the seal between the lure and the first pour of silicone rubber. This seal prevents the second pour of silicone from leaking between the lure and the first half of the mold which will mess up your parting line.
Spend the time necessary to clean up all clay residue around the lure and the seam line. Paper towel and a little rubbing alcohol may help the cleaning process. Do NOT use rubbing alcohol on a painted lure as it may smear or remove the paint messing up your original. Once the clay has been completely removed, you are ready to apply release and pour the second half of your mold.
Using either Alumilite’s UMR release or Rubber to Rubber Mold Release, apply release to prevent the second pour of Alumilite’s High Strength 2 silicone rubber from bonding to the first. Note: Release is not required unless you are pouring onto another silicone that you do not wish to bond it to. Silicone only sticks (or bonds) to another silicone. This is why we did not need any mold release on the first half of the lure that was laid up in clay.
If you do not have either of Alumilite’s release agents, use a very thin layer of Vaseline to prevent the silicone from bonding to itself.
You are now ready to mix up your second batch of silicone rubber, degas it or brush on the initial layer, and pour the remaining silicone over the second half of the lure to complete your two piece mold.
Using an Alumilite Excel Knife, cut small reservoirs in the mold at the top of the vents and pour hole to open them up. These openings should only go half way down the vents and pour hold and should not be close to the actual lure. Then simply put the mold together and use tape to hold it in place. Do NOT over tighten the mold and this will distort your lure. The locators will line up the two halves of the mold and will simply need to be held in place.
Mix equal amounts of Alumilite White thoroughly and slowly pour the mixed resin into the mold through the pour hole. Alumilite White is extremely thin and flows very well into the mold which will pick up the exact detail of your original lure. Microballoons or Tungsten can also be added to the resin to increase or decrease the density.


